
Welcome to our comprehensive guide on Husqvarna zero turn hydraulic fluid change.
I am an experienced lawn care professional with over a decade of hands-on experience in maintaining and servicing a variety of lawn mowers, including Husqvarna’s zero turn models.
Key Takeaways
- Preparation involves disconnecting the battery and positioning the mower on a level surface. Essential tools include a specific type of wrench for the drain plug and about 15 pints (7.5 liters) of hydraulic fluid.
- The process involves lifting the mower and removing the wheels, draining old fluid, replacing the filter, refilling with new fluid, and purging air from the system. Each step must be followed carefully for optimal results.
- After changing the fluid, check for leaks and perform a test run to ensure smooth operation. Common issues during the fluid change can include dirty filters, low fluid levels, or air in the lines, which require specific troubleshooting steps.
- It’s crucial to change the hydraulic fluid of a Husqvarna zero turn mower every 1200 hours of use to maintain performance. Signs like partial or full loss of drive can indicate the need for a fluid change earlier.
Identifying the Need for Hydraulic Fluid Change in Your Husqvarna Zero Turn Mower
For a Husqvarna zero turn mower, it’s recommended to change the hydraulic fluid every 1200 hours of running time. However, a partial or full loss of drive could indicate that the fluid is nearing the end of its life.
To stay on top of maintenance, follow these guidelines:
- Check the fluid reservoir every 50 hours if your mower is older.
- Inspect the system with a reservoir and dipstick at least every 200 hours.
- Keep in mind that the lifespan of high-grade hydraulic fluid varies depending on usage and maintenance, but it typically lasts around five years.
Required Tools and Materials for Hydraulic Fluid Change
Before starting the hydraulic fluid change process, gathering the necessary tools and components is a prerequisite.
The specific wrench type and size required to open the drain plug of your Husqvarna zero turn mower’s hydraulic system may vary depending on the model, so consult your operator manual or contact the manufacturer to obtain the correct information.
A full fluid exchange requires approximately 15 pints (7.5 liters) of hydraulic fluid. When handling hydraulic fluid, puncture-resistant gloves with a hydraulic oil jet-resistant coating on the palm and fingertips are recommended for safety.
Preparing Your Husqvarna Zero Turn Mower for Hydraulic Fluid Change
Start by disconnecting the battery to prevent any electrical contact or short circuits during servicing.
Next, position the mower on a level surface and secure it with the parking brake to provide a stable working environment.
Disconnecting the Battery
To disconnect the battery in your Husqvarna zero turn mower, follow these steps: raise the seat and rotate it forward, use two ½” wrenches to disconnect the black battery cable, and set the deck to the lowest possible setting.
Disconnecting the battery eliminates the risk of electrical contact or short circuits while servicing the hydraulic system.
Read More: How Long to Charge a Lawn Mower Battery: Quick Guide & Tips
Positioning the Mower
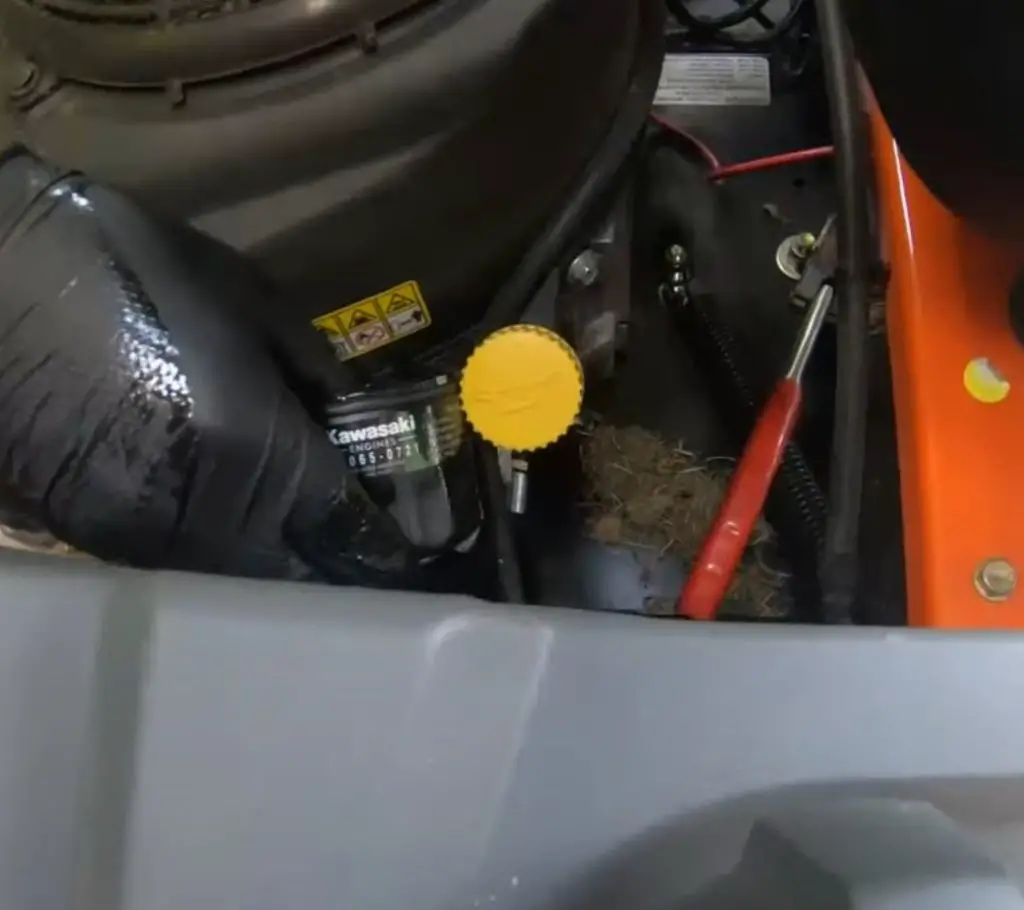
Locate the hydraulic reservoir and filter with the mower on a level surface and the parking brake is engaged. The exact location can be found in your owner’s manual.
To optimize your workspace, place a bucket under the drain plug, typically located underneath the mower, depending on your settings.
Step-by-Step Guide to Changing Hydraulic Fluid in Your Husqvarna Zero Turn Mower
You can proceed with the hydraulic fluid change with the mower now prepared. In the following sections, we’ll guide you through each step of the process:
- Lift the mower and remove the wheels.
- Drain the old fluid.
- Replace the filter.
- Refill the system with new fluid.
- Purge air from the system.
Lifting the Mower and Removing the Wheels

To access the hydraulic system components, you’ll need to lift the rear of your mower. Place two jack stands on the left and right sides of the rear wheel to lift the mower securely. Once the mower is lifted, remove the wheel to access the hydraulic fluid filter.
With the jack stands in place, remove the jack to provide additional workspace. Ensure that the rear wheels are at least three inches from the floor during this process.
Draining the Old Hydraulic Fluid

Locate the drain plug at the bottom of the engine to perform an oil change and drain the old hydraulic fluid. Using a socket wrench, remove the drain plug and allow the old fluid to drain into a suitable container.
It’s important to dispose of the old fluid responsibly, as it can be harmful to the environment. Consult your local waste management facility for proper disposal procedures.
Replacing the Hydraulic Oil Filter
A clean hydraulic oil filter is crucial for optimal performance and longevity of your mower’s hydraulic system. To replace the filter, follow these steps:
- Remove the metal guards that protect the filter.
- Secure a new (oiled gasket) filter onto the mower by hand-tightening it initially.
- Use a strap wrench to give the filter a quarter turn for proper installation and fit.
- This ensures that the filter is securely in place and prevents any potential issues during operation.
By rubbing a small amount of oil on the rubber gasket guarantees a tight seal and an easier removal for next oil change.
Refilling the Hydraulic System with New Fluid
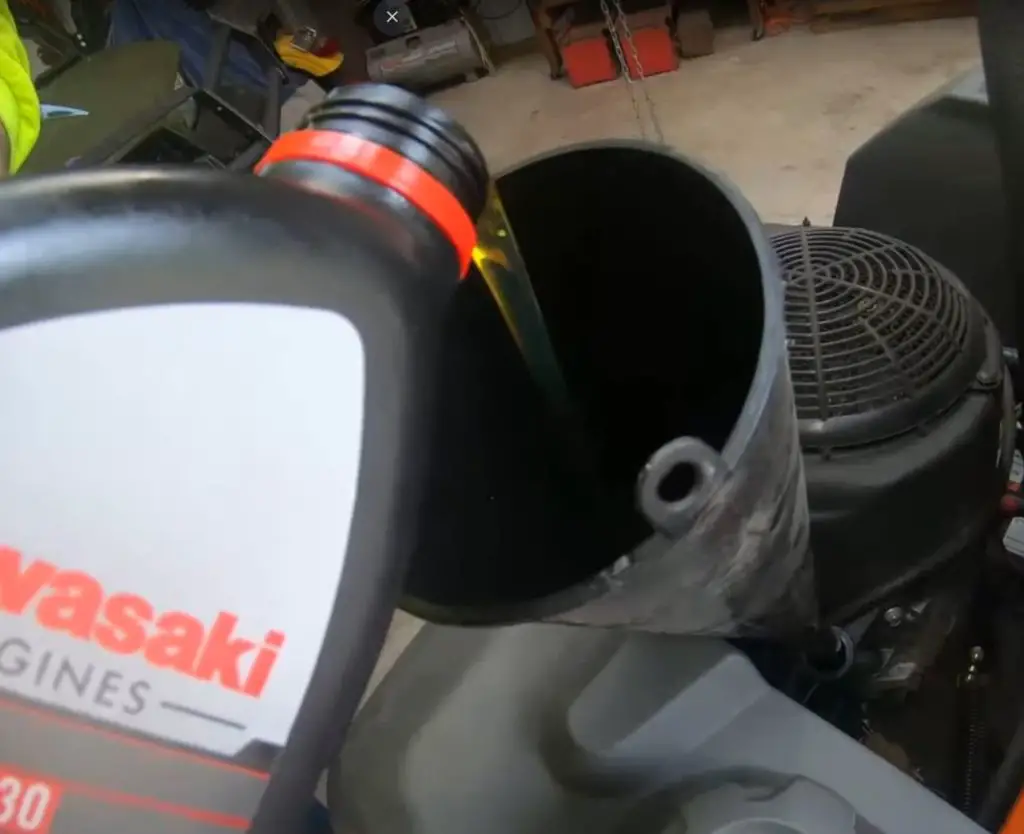
Once the old fluid is drained and the filter replaced, you can proceed to refill the hydraulic system with new fluid. Using a funnel, pour the new hydraulic fluid into the reservoir gradually.
The Husqvarna zero turn mower requires approximately 15 pints or 7.5 liters of hydraulic fluid for a full exchange.
Continue filling until the fluid reaches the designated full mark on the reservoir.
Purging Air from the Hydraulic System
To purge air from the hydraulic system, follow these steps:
- Position the cylinder with the ports facing up to drive the air up to the pump.
- Ensure that the hydraulic pump reservoir is vented.
- Identify the bleed valve.
- Open the bleed valve to allow the air to escape.
- Move the air to the top of the cylinder for enhanced air release.
- Leave the bleed valve open until hydraulic fluid flows from the valve, indicating that the air has been fully released.
Finally, close the bleed valve and run the pump for a brief period to prime it and guarantee proper operation.
Testing and Finalizing the Hydraulic Fluid Change
After completing the hydraulic fluid change process, you should test your mower and confirm the change.
In the following sections, we’ll cover how to check for leaks, and perform a test run to ensure proper operation and performance.
Checking for Leaks
Upon replacing the hydraulic fluid, conducting a system inspection for any leaks is necessary. Ensure that all equipment is shut down and pressure is released before conducting your inspection.
Using a piece of paper or cardboard, carefully check for leaks around the hydraulic system components, particularly at common leak points such as hoses, pumps, and fittings.
Addressing any leaks promptly can prevent further damage and ensure the longevity of your mower’s hydraulic system by allowing timely repair.
Performing a Test Run
After the hydraulic fluid change and addressing leaks, you can commence a test run of your mower.
During the test run, look for indications of correct operation, such as smooth and responsive maneuverability, no abnormal noises or vibrations, and consistent power delivery.
If you encounter any issues, such as diminished performance or increased power demand, it may be necessary to repeat the purging process.
After a successful test run, you can confidently finalize the hydraulic fluid change and continue using your Husqvarna zero turn mower with optimal performance.
Recommended Hydraulic Fluid Types for Husqvarna Zero Turn Mowers
Choosing the appropriate hydraulic fluid for your Husqvarna zero turn mower contributes to optimal performance and longevity. Suitable options include:
- Straight 30
- 10 W30
- 15 W30
- 20 W50
- 15 W50
Remember that the viscosity index should not exceed the VI viscosity index, and motor oil with a high viscosity index is not recommended due to its additives.
It’s important to note that using the wrong kind of oil can damage engines. To avoid this, consider seeking video recommendations a customized solution for your specific vehicle and engine type.
Troubleshooting Common Hydraulic Fluid Change Issues
While changing the hydraulic fluid in your Husqvarna zero turn mower is typically a straightforward process, you may encounter some common issues, including:
- Dirty or damaged filters
- Low fluid levels
- Air in the lines
- Electrical issues
- Obstructions in the drive system
These are all potential problems that can arise during a fluid change.
To resolve these issues, follow these steps:
- Visually inspect the machine for any visible damage or loose parts.
- Check the fluid level and top up if necessary.
- Reset the electric motor by turning it off and then back on again.
- Address any contamination or clogged filters by cleaning or replacing them.
- Ensure that the correct fluid amounts and types are being used. By troubleshooting and resolving these common issues, you’ll ensure a successful fluid change and keep your mower operating at peak performance.
Related Articles:
- Husqvarna Zero Turn Hydrostatic Drive Problems & Solutions
- Husqvarna Zero Turn Mower Problems: Expert Fixes
- Husqvarna Z254F Problems: Hydrostatic Transmission Issues
Summary
Husqvarna zero turn hydraulic fluid change is a crucial aspect of regular maintenance that ensures optimal performance and longevity.
By following the detailed steps outlined in this guide, you’ll be well-equipped to master the fluid change process and keep your mower running smoothly for years to come.
Always use the recommended hydraulic fluid types and troubleshoot any issues that may arise during the process.
With proper care and maintenance, your Husqvarna zero turn mower will remain a reliable and efficient workhorse, ready to tackle any lawn care task.
Frequently Asked Questions
How often should you change hydraulic fluid in zero-turn mower?
It is recommended to change the hydraulic fluid of a zero-turn mower every 1000 hours of operation, or roughly every six months if you don’t use it too much.
What kind of hydraulic fluid goes in a zero-turn mower?
For zero-turn mowers, 20W-50 motor oil or 15W-50 synthetic motor oil is typically recommended for use in Hydro-Gear transmissions and pumps. Oil reservoirs are often mounted to the frame behind the seat for easy access and oil level checking.
What oil goes in a Husqvarna hydrostatic transmission?
For Husqvarna hydrostatic transmissions, you should use a 10W-30 non-synthetic engine oil with a friction modifier to ensure optimal performance in both hot and cold environments.
How to change hydraulic fluid in zero turn mower?
Prepare your mower, place a bucket underneath the drain plug, let all the oil drain out, replace the filter and add new oil to the tank, then start up the mower.
How can I tell if my hydraulic system has a leak?
Look for signs of hydraulic fluid leaking from the mower, reduced responsiveness, air in the lines, impaired forward or backward motion, and difficulty initiating the mower to tell if your hydraulic system has a leak.