If you’re grappling with the frustration of a Cub Cadet zero turn mower that won’t start, you’re not alone. As an expert with years of experience repairing lawn equipment, I’ve honed the ability to swiftly pinpoint and resolve the root causes of your mower’s issues.
Whether it’s mechanical, intake air, or fuel-related complications—or even elusive electrical faults—I’m here to provide a clear, no-nonsense guide to diagnosing and fixing the problem.
Trust in my expertise as we delve into the essential steps to revive your mower, ensuring you can return to maintaining your lawn with confidence.
Quick Summary
- To troubleshoot a non-starting Cub Cadet zero turn mower, it’s crucial to examine mechanical issues, intake air troubles, fuel-related issues, and electrical problems.
- Regular maintenance, including cleaning the air filter and checking the spark plug, can prevent many starting issues with Cub Cadet zero turn mowers.
- Most starting problems with lawn mowers, such as the Cub Cadet zero turn, are often due to old fuel or a dirty air filter.
- In my experience, persistent and thorough troubleshooting, coupled with regular upkeep, is key to keeping your Cub Cadet zero turn mower in optimal condition for reliable starting.
Common Reasons Why Cub Cadet Zero Turn Wont Start
When troubleshooting a non-starting Cub Cadet zero turn mower, several culprits, including a drained battery or clogged fuel filter, often emerge as the usual suspects.
The common ares to arise an issue are:
- Mechanical
- Intake Air Troubles
- Fuel Related Issues
- Electrical
Related: Cub Cadet Zero Turn Mower Problems
Mechanical
Moving on to the mechanical aspects, I’ve found that a damaged flywheel key can prevent my Cub Cadet zero turn from starting. It’s a small but critical component that can shear and disrupt the engine timing.
Additionally, broader engine problems could be at play, which I’ll need to inspect closely.
Flywheel Key Problem
Identify Problem:
- Symptoms: The mower won’t start; engine fails to ignite.
- Cause: A damaged or sheared flywheel key disrupts the timing between the flywheel and crankshaft, leading to starting failures.
Solution:
- Preliminary Checks: Ensure the ignition switch functions and the battery is charged. Also, verify that the spark plugs are not corroded and the choke operates smoothly.
- Flywheel Key Inspection:
- Safety Precautions: Disconnect the spark plug and ensure the mower is off.
- Access the Flywheel: Remove necessary components to reach the flywheel.
- Examine the Key: Check for visible signs of damage or shearing.
- Replacement:
- Remove the Damaged Key: Carefully extract the broken or sheared key.
- Install a New Key: Ensure the new key fits perfectly in the slot.
- Reassemble: Put back any removed components and reconnect the spark plug.
- Test: Start the mower to check if the issue is resolved.
Engine Problems
Identify Problem:
- Symptoms: Mower fails to start even after basic checks (fuel, air, spark).
- Possible Causes: Issues with internal engine components such as pistons, rings, and valves. These may be worn out or damaged.
Solution:
- Check Fuel System: Inspect for clogs or debris in the fuel system. This involves checking fuel lines, the fuel filter, and the carburetor.
- Inspect Ignition System:
- Ensure the solenoid is functioning correctly. A faulty solenoid can prevent electrical current from reaching the starter motor.
- Test the voltage at the ignition switch to confirm it’s working. A malfunctioning switch could disrupt the ignition process.
- Evaluate Fuel Pump:
- Confirm that the fuel pump is operating properly. A failing fuel pump won’t deliver the necessary fuel to the engine.
- Examine Internal Components:
- If the above systems are functioning, inspect internal engine components like pistons, rings, and valves for wear or damage.
- This may require partial disassembly of the engine and should be done with care or by a professional.
- Replace Faulty Parts: Identify and replace any damaged or worn-out components.
- Reassemble and Test: After repairs, reassemble any disassembled parts and test the mower to ensure the issue is resolved.
Intake Air Troubles
When my Cub Cadet zero turn won’t start, I often find the issue is with the air intake system.
A clogged or dirty carburetor can choke the engine of air, preventing it from firing up.
Similarly, a clogged engine air filter can hinder airflow, making it impossible for the engine to start.
Clogged Dirty Carburetor
Identify Problem:
- Symptoms: The mower won’t start, indicating a potential air intake issue.
- Cause: A clogged carburetor, preventing free flow of intake air and proper fuel mixture, leading to ignition problems.
Solution:
- Initial Preparations:
- Ensure the mower’s battery is fully charged.
- Check that the starter is functioning correctly.
- Carburetor Inspection and Cleaning:
- Access the Carburetor: Locate and remove the necessary components to access the carburetor.
- Inspect for Clogs: Look for any visible debris or blockages that might be impeding airflow or fuel flow.
- Cleaning Process: Use a carburetor cleaner spray to clean the carburetor. Focus on the jets and passageways where clogs commonly occur.
- Careful Handling: Handle small components with care to avoid damage or misplacement.
- Reassemble and Test:
- After cleaning, reassemble the carburetor and attached components.
- Test the mower to ensure it starts and runs smoothly, indicating the clog has been successfully cleared.
- Regular Maintenance:
- Regular cleaning and maintenance of the carburetor can prevent future clogs and ensure smooth operation of the mower.
Clogged Engine Air Filter
Identify Problem:
- Symptoms: The mower fails to start, indicating possible suffocation of the engine due to restricted airflow.
- Cause: A clogged engine air filter, either paper or foam type, blocking the necessary air from reaching the engine.
Solution:
- Cleaning a Paper Air Filter:
- Remove the Filter: Carefully take out the paper air filter.
- Clean the Filter: Use compressed air to blow out debris from the filter. Aim the air from the inside of the filter outwards to avoid damaging the fibers.
- Inspect After Cleaning: Ensure the filter is not damaged and still allows light to pass through, indicating it’s clean and functional.
- Cleaning a Foam Air Filter:
- Remove and Inspect: Take out the foam air filter and check for any damage.
- Washing Process: Gently clean the foam filter with soap and water.
- Rinse and Dry: Thoroughly rinse and allow the filter to dry completely.
- Re-oiling (If Applicable): If the foam filter requires oiling (check manufacturer’s guidelines), lightly coat it with clean engine oil and squeeze out any excess.
- Reinstallation and Testing:
- Reinstall Filters: Once both paper and foam filters are cleaned and dried (or replaced if damaged), reinstall them correctly.
- Test the Mower: Start the mower to check if the issue is resolved and the engine operates smoothly.
- Regular Maintenance:
- Routine Checks: Regularly inspect and clean both paper and foam air filters to prevent future clogs and ensure optimal engine performance.
Fuel Related Issues
Now, let’s turn our attention to potential fuel-related issues that can prevent your Cub Cadet zero turn from starting.
I’ll cover common culprits like:
- A malfunctioning fuel pump
- A clogged filter or fuel line
- Problems with the fuel solenoid
- The impact of using bad or old gas
Bad Fuel Pump
Identify Problem:
- Symptoms: Mower doesn’t start, possibly due to lack of fuel reaching the engine.
- Cause: A malfunctioning fuel pump failing to deliver fuel from the tank to the engine.
Solution:
- Diagnose Fuel Pump Issue:
- Check if the engine is receiving fuel. A dry carburetor or fuel line can indicate a pump issue.
- Listen for the fuel pump’s operation when attempting to start the mower. A silent fuel pump could signify a problem.
- Replacing the Fuel Pump:
- Purchase the Correct Replacement: Ensure you get a fuel pump compatible with your Cub Cadet model.
- Remove the Old Pump: Disconnect the fuel lines and remove the old pump, taking care to prevent fuel spillage.
- Install the New Pump: Connect the new pump, ensuring all fittings are secure and leak-free.
- Additional Checks:
- Alternator: Ensure the alternator is charging the battery correctly. A weak battery can affect the starting system.
- Ignition Coil: Check the ignition coil for a strong spark. A faulty coil can prevent the engine from starting.
- Electric Start System: Confirm that the electric start system is receiving ample power.
- Inspect the Flywheel: Look for any damage to the flywheel that could affect the engine’s starting capability.
- Test After Repair:
- After replacing the fuel pump and performing these checks, attempt to start the mower to see if the issue is resolved.
- Regular Maintenance:
- Regularly inspect the fuel system as part of your mower’s maintenance routine to prevent future issues.
Read More: Bad Boy Fuel Gauge Not Working
Clogged Fuel Filter
Identify Problem:
- Symptoms: The mower fails to start, which might be due to restricted fuel flow.
- Cause: A clogged fuel filter blocking the passage of fuel to the engine, thus hindering the starting process.
Solution:
- Replace the Fuel Filter:
- Locate and Remove the Old Filter: Identify the fuel filter location, usually along the fuel line. Carefully remove it, ensuring to catch any spilled fuel.
- Install a New Filter: Fit the new filter in place, paying attention to the direction of fuel flow marked on the filter.
- Secure Connections: Ensure all connections are secure and leak-free.
- Additional Checks:
- Battery: Verify that the mower’s battery is fully charged. A low battery can affect the starting system.
- Starter and Solenoid: Test the starter and solenoid for any faults. A malfunctioning starter or solenoid can prevent the engine from turning over.
- Ignition Switch: Check the ignition switch for proper operation. A faulty switch can disrupt the electrical flow needed for starting.
- Systematic Approach:
- After replacing the fuel filter and performing these additional checks, try starting the mower again.
- This methodical approach addresses various aspects that could affect the starting process, ensuring a comprehensive solution.
- Preventative Maintenance:
- Regular inspection and timely replacement of the fuel filter can prevent future starting issues. It’s a simple yet effective part of mower maintenance.
Clogged Fuel Line
Identify Problem:
- Symptoms: The mower won’t start, and the battery and spark plug issues have been ruled out.
- Cause: A clogged fuel line preventing fuel from reaching the engine, which is essential for starting.
Solution:
- Check Fuel Valve and Tank:
- Ensure Fuel Valve is Open: Verify that the fuel valve is open to allow fuel flow.
- Inspect Fuel Tank: Look for any blockages in the fuel tank that could restrict fuel flow.
- Clearing the Fuel Line:
- Locate the Clogged Section: Trace the fuel line from the tank to the carburetor to find where the blockage might be.
- Remove and Clean the Line: Disconnect the fuel line and use a suitable cleaner (like carburetor cleaner) to clear out any blockages.
- Use Compressed Air: After applying the cleaner, use compressed air to blow through the line and ensure it’s completely clear.
- Reattach the Fuel Line: Once cleared, reattach the fuel line securely.
- Additional Diagnostics:
- Multimeter Testing: If the problem persists, use a multimeter to check for issues with the spark plug or carburetor.
- Testing After Repair:
- After clearing the fuel line and conducting any additional diagnostics, attempt to start the mower again.
- This process ensures that fuel can freely flow to the engine, which is crucial for starting.
- Preventative Maintenance:
- Regular checks and cleaning of the fuel line can prevent future clogs. Keeping the fuel system clean is an essential aspect of mower maintenance.
Fuel Solenoid Issue
Identify Problem:
- Symptoms: The mower doesn’t start even though the fuel line is clear.
- Cause: Potential malfunction of the fuel solenoid, which could be preventing fuel from reaching the engine.
Solution:
- Inspect the Fuel Solenoid:
- Check Solenoid Functionality: Use an ohmmeter to test the armature of the fuel solenoid. A malfunctioning solenoid will not allow proper fuel flow.
- Replace if Necessary: If the solenoid is not functioning correctly, replace it with a new one that matches your mower’s specifications.
- Verify Switch Settings:
- Check Throttle and Other Switches: Ensure that all related switches, including the throttle, are set correctly. Incorrect settings can impact fuel delivery.
- Look for Fuel Leakage:
- Inspect for Leaks into Crankcase: Check if there’s any fuel leaking into the crankcase. Such leaks can prevent the engine from starting by flooding it or disrupting the fuel-air mixture.
- Reassemble and Test:
- After addressing the solenoid issue, reassemble any components that were removed.
- Test the mower to see if it starts and runs smoothly.
- Preventative Maintenance:
- Regularly inspect the fuel solenoid and related components as part of your mower’s maintenance routine. This can prevent future issues with starting and engine performance.
Bad or Old Gas
Identify Problem:
- Symptoms: The mower fails to start, suggesting an issue in the fuel system.
- Cause: Bad or old gasoline in the fuel tank, leading to clogged fuel lines or carburetor, and preventing the engine from starting.
Solution:
- Drain and Replace Fuel:
- Drain the Tank: Safely remove the old or stale fuel from the mower’s fuel tank.
- Refill with Fresh Gasoline: Fill the tank with fresh, high-quality fuel suitable for your mower.
- Check Wiring and Interlock System:
- Inspect Wiring: Ensure all electrical connections and wiring are intact and not damaged.
- Verify Interlock System: Check that the mower’s interlock system is functioning correctly. This system prevents the engine from starting if certain safety conditions are not met.
- Inspect Spark Plug:
- Check for Spark: Once the fuel has been replaced, verify that the spark plug is working correctly to ensure proper ignition.
- Replace or Clean Spark Plug if Necessary: If the spark plug is fouled or old, clean it or replace it to guarantee efficient starting.
- Testing After Maintenance:
- After completing these steps, attempt to start the mower to confirm if the issue has been resolved.
- Preventative Measures:
- Regularly check the fuel quality and avoid leaving fuel in the tank for extended periods, especially during off-season storage. This can prevent similar issues in the future.
Electrical
I’ll examine common electrical issues such as a faulty ignition coil, a bad ignition switch, or a defective spark plug that can prevent your mower from firing up.
We’ll also consider problems with the safety switch and charging system that could be causing starting difficulties.
Ignition Coil Issue
Identify Problem:
- Symptoms: Mower fails to start, indicating a possible ignition problem.
- Cause: A faulty ignition coil, which is crucial for providing the spark needed to start the engine.
Solution:
- Initial Checks:
- Check the Battery: Verify that the battery has sufficient power. A weak battery may not provide the spark necessary for ignition.
- Remove Old Fuel: Drain any stale fuel from the mower, as it can contribute to starting issues.
- Replace Fuel Filter: Change the fuel filter if it is clogged or dirty, to ensure proper fuel flow to the engine.
- Inspect Spark Plug: Examine the spark plug for wear or damage. Replace it if needed, as a bad spark plug can hinder the ignition coil’s function.
- Addressing the Ignition Coil:
- Inspect Coil Connections and Resistance: Check the connections and measure the coil’s resistance to ensure it falls within the mower’s specifications.
- Replace the Ignition Coil if Faulty: If the coil is indeed defective, replace it with a new one that matches your mower’s model.
- Reconnect Everything Securely: After replacement, ensure all connections are secure and properly reassembled.
- Test the Mower:
- After completing these steps, start the mower to see if the issue has been resolved.
- Ongoing Maintenance:
- Regularly inspect the ignition coil, battery, and spark plug as part of maintenance to prevent future starting issues.
Bad Ignition Switch
Identify Problem:
- Symptoms: The mower won’t start, indicating a possible electrical issue.
- Cause: A defective ignition switch failing to send power to the engine’s electrical components.
Solution:
- Replace the Ignition Switch:
- Disconnect the Battery: Before starting any work, ensure the safety by disconnecting the battery to prevent accidental starting or electrical shorts.
- Remove the Old Switch: Locate and carefully remove the old ignition switch from the mower. This may involve unscrewing or unfastening it from its mount.
- Install the New Switch: Place the new ignition switch into position and connect it as the old one was connected. Ensure all connections are secure and correctly oriented.
- Check Other Electrical Components:
- Ensure Starter and Solenoid are Secure: After replacing the ignition switch, check the connections to the starter and solenoid to make sure they are secure and functioning.
- Reconnect the Battery: Once everything is in place and checked, reconnect the battery.
- Testing the Mower:
- After completing the switch replacement and reconnection of electrical components, test the mower to see if it starts and runs smoothly.
- Regular Maintenance:
- Regular checks of the ignition switch and related electrical components can prevent future starting issues and ensure the smooth operation of the mower.
Defected Spark Plug
Identify Problem:
- Symptoms: The mower doesn’t start even after checking the ignition switch.
- Cause: A defective spark plug, which is essential for igniting the fuel in the engine.
Solution:
- Preliminary Checks:
- Check the Battery and Solenoid: Ensure the battery is fully charged and the solenoid is functioning correctly. Faults in these components can affect the spark plug’s performance.
- Inspect the Voltage Regulator: Verify that the voltage regulator is working properly. A malfunctioning regulator can lead to electrical issues that affect the spark plug.
- Replace the Spark Plug:
- Remove the Old Spark Plug: Carefully unscrew and remove the existing spark plug from the engine.
- Inspect for Signs of Wear: Look for any signs of damage or excessive wear, such as cracks, burnt electrodes, or carbon buildup.
- Install a New Spark Plug: Replace with a new spark plug that matches the specifications for your mower model. Ensure it’s properly gapped as per the manufacturer’s guidelines.
- Securely Reattach: Tighten the new spark plug securely, ensuring a good electrical connection.
- Inspect Air and Fuel Filters:
- Check if the air and fuel filters are clogged. Clean or replace them as necessary to ensure proper fuel and air flow.
- Testing After Replacement:
- Once the new spark plug is installed and other components are checked, attempt to start the mower. A functioning spark plug should enable the engine to start.
- Regular Maintenance:
- Regular inspection and replacement of the spark plug, along with checks on the battery, solenoid, and voltage regulator, are vital for the smooth operation of the mower. This prevents future issues with starting and engine performance.
Safety Switch Problem
Identify Problem:
- Symptoms: The mower won’t start, which might be due to electrical or safety issues.
- Cause: A malfunctioning safety switch, designed to prevent the mower from starting under unsafe conditions, could be inhibiting the starting process.
Solution:
- Locate and Inspect the Safety Switch:
- Identify the Switch Location: Find the safety switch on your mower. Common locations include under the seat, near the clutch, or around the cutting deck.
- Check for Damage or Disconnection: Inspect the switch for any visible signs of damage, wear, or disconnection. A faulty switch may interfere with the electrical circuit required to start the engine.
- Testing the Switch:
- Use a Multimeter: If possible, use a multimeter to test the continuity of the safety switch. Lack of continuity indicates a malfunctioning switch.
- Replace if Necessary: If the switch is found to be defective, replace it with a new one that matches your mower’s specifications.
- Check Battery Voltage:
- Ensure Adequate Power: Test the battery voltage as it can affect the air to fuel ratio, which is vital for engine ignition. A weak battery might not provide sufficient power for the safety switch to function correctly.
- Reassemble and Test:
- Once any faulty switches are replaced and the battery is checked, reassemble any disassembled parts and test the mower to see if the issue is resolved.
- Regular Maintenance and Checks:
- Regular inspection of safety switches and the electrical system, including the battery, can prevent future starting issues and ensure the mower operates safely and efficiently.
Faulty Battery Charging System
Identify Problem:
- Symptoms: The mower fails to start, indicating a possible power issue.
- Cause: A malfunctioning battery charging system, leading to an inadequately charged battery that lacks the power to start the engine.
Solution:
- Check Battery Voltage and Connections:
- Test Battery Voltage: Use a multimeter to check the battery’s voltage. A voltage reading significantly lower than the battery’s rated voltage suggests charging issues.
- Inspect Connections: Look for any corroded or loose connections. Corrosion can inhibit charging, and loose connections can disrupt the flow of electricity.
- Charge or Replace the Battery:
- Charge the Battery: If the voltage is low but the battery is otherwise in good condition, try charging it.
- Replace the Battery: If charging doesn’t help, or the battery is old and no longer holds a charge effectively, it may be time to replace it.
- Inspect the Starter and Solenoid:
- Starter Functionality: Ensure the starter motor is operating correctly. A malfunctioning starter can prevent the engine from turning over.
- Solenoid Check: The solenoid should click and engage when attempting to start the mower. Lack of this sound or engagement can indicate a problem.
- Spark Plug Inspection:
- Check for Spark: If there’s no spark at the spark plug, this could be a result of insufficient power from the battery or issues in the electrical system, including the charging system.
- Reassemble and Test:
- After addressing the above points, reassemble any disassembled parts and test the mower. If the battery is now charged and everything else is in order, the mower should start.
- Regular Maintenance:
- Regularly inspecting the battery, charging system, and electrical connections can prevent future issues with starting and ensure consistent mower performance.
Loose or Corroded Cables, Wiring, and Terminals on the Battery System
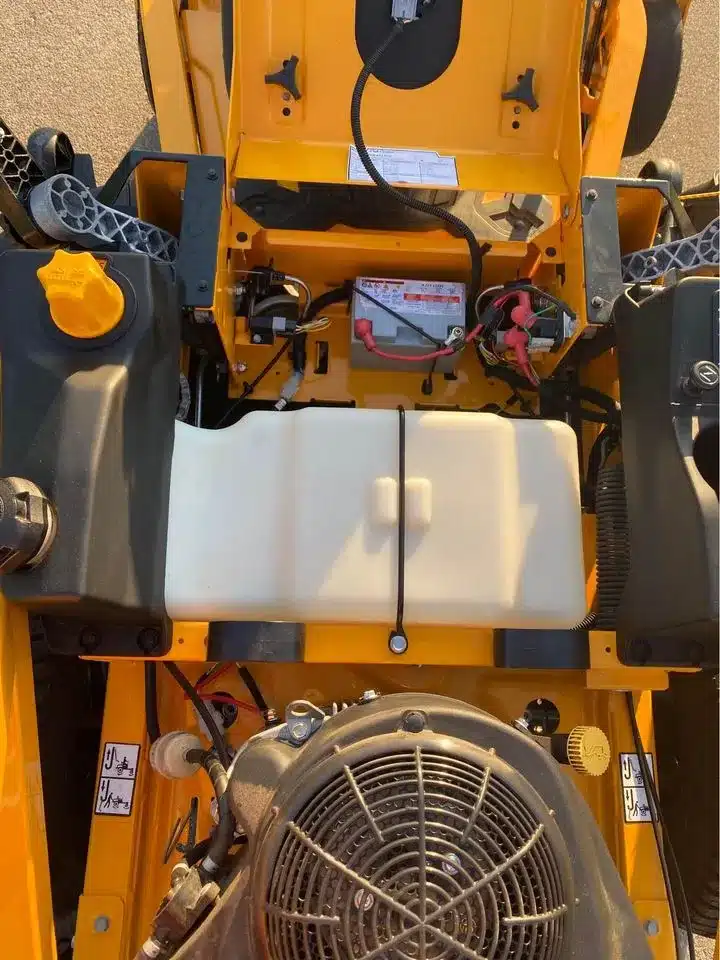
Identify Problem:
- Symptoms: The mower doesn’t start, suggesting an issue in the electrical system.
- Cause: Loose or corroded cables, wiring, and terminals connected to the battery system, which can hinder the flow of power necessary to start the mower.
Solution:
- Inspect and Tighten Loose Cables:
- Check All Connections: Examine the cables and wiring connected to the battery, starter, and solenoid. Look for any loose connections that might disrupt the power flow.
- Tighten Connections: Secure any loose cables or wiring to ensure a stable and consistent power supply.
- Clean Corroded Terminals:
- Identify Corrosion: Corroded terminals often appear with a white or greenish buildup.
- Clean the Terminals: Use a wire brush or a special battery terminal cleaner to remove corrosion. For heavy corrosion, a mixture of baking soda and water can be used to neutralize the acid.
- Reconnect Securely: After cleaning, reconnect the terminals tightly to ensure good electrical contact.
- Check the Carburetor and Fuel Filter:
- While addressing the electrical system, also inspect the carburetor and fuel filter for any blockages or old fuel that could be contributing to starting issues.
- Testing After Repairs:
- Once all connections are secure and clean, and other potential issues are checked, attempt to start the mower to see if the issue is resolved.
- Regular Maintenance:
- Regular inspection of the mower’s electrical connections and cleaning of battery terminals can prevent similar starting problems in the future. Maintaining the fuel system, including the carburetor and fuel filter, is also essential for reliable operation.
Weak or Bad Battery
Identify Problem:
- Symptoms: The mower fails to start, which could be due to power issues.
- Cause: A weak or bad battery that doesn’t have enough charge to power the starting mechanism of the engine.
Solution:
- Check the Battery’s Voltage:
- Voltage Test: Use a multimeter to measure the battery’s voltage. If it’s significantly lower than the battery’s rated voltage, it indicates that the battery is weak or failing.
- Visual Inspection: Look for signs of damage, corrosion, or leakage which could also indicate a bad battery.
- Replace the Battery:
- Choose the Correct Replacement: Find a replacement battery that matches the specifications required for your Cub Cadet mower.
- Install the New Battery: Safely remove the old battery, ensuring all connections are disconnected. Install the new battery and securely reconnect all terminals.
- Testing After Replacement:
- Once the new battery is installed, try starting the mower. A fresh battery should provide the necessary power for the spark plug to fire and the engine to start.
- Regular Battery Maintenance:
- To prevent future starting issues, regularly check the battery’s charge and condition. Keeping the battery terminals clean and ensuring the mower’s charging system is functioning correctly can extend the battery’s life.
- Preventative Measures:
- If the mower is not in use for an extended period, consider using a battery maintainer to keep the battery charged. Store the battery in a cool, dry place to prevent degradation.
Our Verdict
In my journey with the quality Cub Cadet zero turn mower, I’ve faced my share of starting troubles. But through trial, error, and a lot of patience, I’ve learned that the key to a smooth start often lies in addressing the basics.
Whether it’s a drained battery, a clogged fuel filter, or those elusive electrical gremlins, the solution usually hides in plain sight.
From the practical experience of dealing with a dirty carburetor to the satisfaction of fixing a faulty ignition coil, each repair has sharpened my troubleshooting skills.
I’ve realized that regular maintenance, like changing the oil, cleaning the air filter, and inspecting the spark plug, can prevent many of these issues.
And yes, using the mower frequently does help keep it in top shape!
My advice? Stay vigilant with the small things; they often make the biggest difference.
Frequently Asked Questions
How does weather or seasonal change affect the starting reliability of a Cub Cadet zero turn mower?
Cold weather can thicken oil and strain batteries, making my mower harder to start. In spring, dampness and old fuel from last season may also cause starting issues until I address them.
What are the best practices for long-term storage of a Cub Cadet zero turn to ensure it starts reliably in the next season?
For long-term storage, I always stabilize the fuel, change the oil, and clean the air filter to ensure my mower starts up smoothly when the next season rolls around.
Are there any specific maintenance schedules recommended for Cub Cadet zero turn mowers to prevent starting issues?
I’m checking the manual for maintenance schedules; they recommend regular oil changes, filter replacements, and spark plug inspections to keep my Cub Cadet zero turn mower running smoothly and avoid any starting problems.
Can using aftermarket or non-original parts on my Cub Cadet zero turn lead to starting problems?
Using aftermarket parts on my mower could cause starting issues. They might not meet the original specifications, leading to compatibility problems that affect the engine’s performance and, ultimately, its ability to start.
How does the usage frequency of my Cub Cadet zero turn mower impact its ability to start over time?
I’ve found that regularly using my mower keeps the battery charged and the engine in good shape, which helps prevent starting issues that can arise from letting it sit idle for too long.