As a seasoned landscape professional with over a decade of experience in lawn maintenance and equipment care, I understand the importance of keeping your zero-turn mower in top condition.
Changing the blades on your mower is a crucial task that directly impacts the health of your lawn and the efficiency of your mower.
In this guide, I’ll share my expertise in a concise, straightforward manner to help you change the blades on your zero-turn mower safely and effectively, ensuring that every word here is aimed at enhancing your understanding and skills in mower maintenance.
Let’s dive into the essentials of blade replacement and help you maintain a pristine lawn with your well-tuned equipment.
Quick Summary
- The process of changing blades on a zero-turn mower includes powering down the mower, securing it, locating and securing the blades, loosening and removing the old blades, and installing new ones.
- Ensuring the mower is positioned on a flat, level surface and using the correct tools are crucial steps in the blade-changing process to avoid damage or injury.
- A study by the Outdoor Power Equipment Institute found that proper maintenance, including blade changes, can improve mower performance by up to 20%.
- From my experience, maintaining sharp and well-conditioned mower blades is key for the health of the lawn and the longevity of the mower.
Getting Started: Positioning Your Zero Turn Mower for Blade Access
Before changing the blades on your zero turn mower, you’ll need to position it on a flat, level surface to ensure safety and accessibility. After all, you don’t want the mower rolling away or wobbling while you’re underneath it.
Step-by-Step Guide: Removing the Old Blades Safely
- Power Down and Disconnect
- Secure the Mower
- Locate the Blades
- Secure the Blade
- Loosen and Remove the Blades
- Install New Blades
Related Articles:
Power Down and Disconnect
Before I even touch the blades, I make sure the mower is completely powered down. I turn off the engine, remove the key, and disconnect the spark plug to prevent any accidental starts.
It’s crucial to follow these steps to ensure my safety during the blade-changing process.
Ensure Safety
- Turn Off the Mower: Always ensure the mower is turned off before starting any maintenance work.
- Let Engine Cool: Allow the engine to cool down to avoid any burns or overheating-related issues.
- Remove the Key: Take out the key from the mower to prevent any accidental starts.
- Disconnect Spark Plug Wire: Ensure the spark plug wire is completely disconnected to eliminate any risk of electrical current igniting the engine.
- Engage Parking Brake: Set the parking brake on the mower for additional security and to prevent any unintended movement.
- Prioritize Safety: Remember, following these steps isn’t just about adhering to the manual’s instructions; it’s crucial for ensuring your safety at every step.
Secure the Mower
Before I tackle the blade change, I make sure the zero turn mower is stable. I’ll lift or slightly tilt the mower to get better access to the underside, but only after confirming it’s safely secured.
This step is crucial to prevent the mower from shifting or rolling while I’m working.
Learn More: Danger of Zero Turn Mowers: Unveiling the Hidden Facts
Stabilize the Mower
- Engage Parking Brake: Always engage the parking brake on your zero turn mower to ensure it remains stationary.
- Use Wheel Chocks: Consider using wheel chocks for additional stability, especially when working on an incline.
- Confirm Mower Stability: Before starting blade change, double-check that the mower is immobile. This is a vital safety measure to prevent accidents.
- Remove the Key: Take out the ignition key to prevent any accidental starts.
- Double-Check Security: Recheck all measures to ensure the mower is stable and secure, which is crucial for a safe and effective blade change process.
Lift or Tilt the Mower
To safely access the underside of the zero turn mower for blade maintenance, I follow these steps:
- First, I make sure the mower is cool and the ignition is off.
- Then, I engage the parking brake to keep the mower in place.
- It’s crucial to secure the mower so it doesn’t shift while I’m working.
- Next, I position the lift or support device under the machine according to the manufacturer’s guidelines.
- I ensure that the lift or support device is placed on a flat surface for stability.
- Carefully, I raise the mower using the lift until it’s at a comfortable height for me to reach the blades.
- Before I crawl underneath, I always double-check to ensure that the mower is stable and won’t slip or fall while I’m working on it.
Safety first—I take these precautions to prevent any accidents or injuries while accessing the underside of the zero turn mower.
Access the Blades
Once I’ve got the mower prepped and the deck set to its lowest position, it’s time for me to get to the blades.
I need to remove any obstacles, like the belt covers, ensuring that nothing’s in the way.
Then, I’ll carefully flip the deck over to reveal the blades, ready for inspection and replacement.
Locate the Blades
- Remove Cotter and Deck Pins: Start by removing the cotter pins and deck pins from the mower to prepare for deck removal.
- Slide Out the Deck: Carefully slide the deck out from the mower to get clear access to the blades located underneath.
- Ensure Safe Disengagement: Before sliding out the deck, confirm that all necessary connections have been safely disengaged to prevent any accidents.
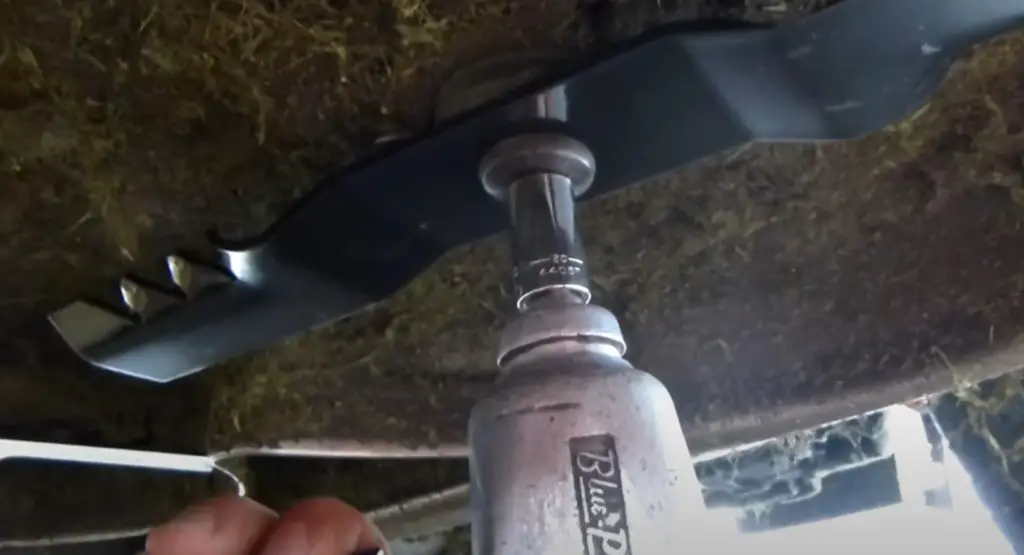
- Locate the Blades: Upon removing the deck, identify the centrally located blades. These are attached to the spindle assembly, which facilitates their powerful rotation.
- Note Blade Orientation: Carefully observe and note the orientation of the blades. It’s essential to reinstall them in the correct direction. Look for indicators like ‘bottom’ or a part number on the blades, which should face downward during installation.
- Ensure Correct Reinstallation: Paying attention to the orientation ensures that the blades will cut effectively once reassembled and put back into operation.
Secure the Blade
- Secure Blades Before Flipping Deck: Prior to flipping the deck to access the blades, it’s important to secure them to prevent rotation and ensure safety during removal.
- Use a Block of Wood: Insert a block of wood between the blade and the mower deck. This simple technique effectively stops the blade from spinning.
- Alternative to Blade Removal Tool: While some might use a specialized blade removal tool, using a block of wood is a straightforward and equally effective method.
Orientation Marking
- Mark Blade Orientation: It’s essential to mark the orientation of the blades before removing them. Note the side of the blade that should face the ground, often indicated by ‘bottom’ or a part number.
- Use a Marker for Clarity: Before loosening the blade nuts and removing the old blades, use a marker to label the side of the blade that will face the grass with the word ‘bottom’. This aids in remembering the correct positioning during reinstallation.
- Prevent Installation Errors: Marking the blades helps avoid any mix-ups or confusion about their orientation, ensuring proper installation.
- Helpful in Maintaining Focus: This technique is particularly useful to stay on track, especially when working quickly or if there’s a risk of getting sidetracked.
Loosen and Remove the Blades
I’ve flipped the deck over and now it’s time to focus on the blade bolts.
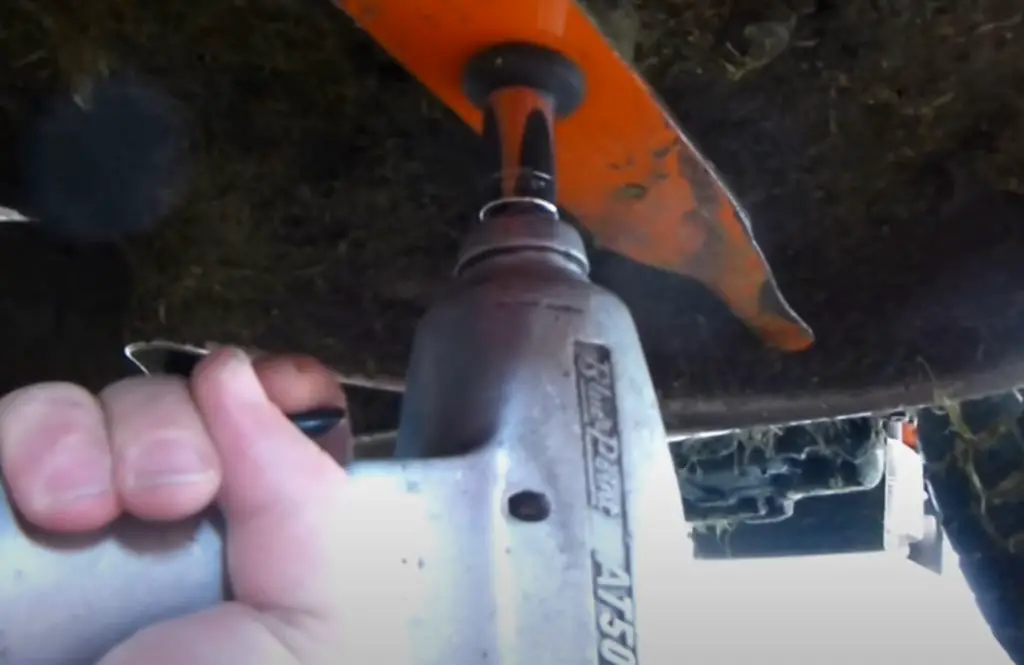
I’ll need a 15/16 socket or wrench to loosen them, ensuring I keep my hands protected with gloves.
It’s crucial to remember to keep the blades from rotating, so I’ll wedge a block of wood against them as I work.
Identify the Blade Bolts
- Identify Blade Bolts: Begin the blade removal process by locating the blade bolts that secure the blades to the deck. Typically, there is one bolt per blade. These bolts are usually large and centered on the blade, making them easy to spot.
- Wear Protective Gloves: Before handling the blades or bolts, put on gloves for protection.
- Proper Tool Placement: Carefully place the tool onto the bolt. Ensure it is properly seated to prevent stripping the bolt.
- Apply Firm, Steady Pressure: Turn the bolt counterclockwise using firm and steady pressure. This is important for loosening the bolt without causing damage.
- Use Penetrating Oil if Necessary: If a bolt is particularly stubborn, apply a bit of penetrating oil to help loosen it.
- Proceed to Removal: With the blade bolts correctly identified and the tool in place, proceed to remove the bolts and move on to the next step in the blade replacement process.
Loosen the Bolts
- Prevent Blade Rotation: Use a block of wood to immobilize the blade, preventing it from spinning while working on the bolts.
- Use the Right Tool: Employ a 15/16 socket or wrench for loosening the bolts.
- Apply Steady Pressure: Carefully apply steady, counterclockwise pressure to the bolts to avoid stripping them.
- Partial Loosening: Loosen the bolts enough to enable blade removal later, without fully removing them at this stage.
Remove the Blades
- Loosen and Remove Nuts: Firmly push to break the resistance of the nuts and unscrew them completely, keeping them in a safe place.
- Note Washers and Spacers: Pay attention to the order and orientation of washers or spacers for correct reassembly.
- Remove Old Blades: Carefully slide off the old blades, noting the direction for correct installation of the new ones.
- Clean the Spindle Area: Inspect and clean the spindle area from any debris or grass buildup for a clean mounting surface.
Prepare for the New Blades
Before I fit the new blades onto my zero turn mower, I’ll need to ensure the workspace is spotless. Any debris or grass clippings around the area can cause complications, so I’ll give it a thorough sweep.
With a clean environment, I’m ready to install the new blades without any hitches.
Clean the Area
- Prepare a Clean Workspace: Start by ensuring your work area is tidy and organized. This is crucial not only for avoiding a mess but also for maintaining safety.
- Remove Debris and Unnecessary Tools: Sweep away any debris, grass clippings, and tools that are not needed for the blade change. This step minimizes the risk of tripping and mixing up parts.
- Lay Down a Tarp: Consider laying a tarp to catch any grass clippings or grease, which simplifies the cleanup process afterwards.
- Wipe Down the Deck: After removing the old blades, clean the deck thoroughly to remove any caked-on grass or dirt. This ensures a clean mounting area for the new blades and optimal operation.
Install New Blades
- Orientation of Blades: Make sure the new blades are oriented correctly before attachment. The cutting edge should face away from the mower deck, and if marked, the side labeled ‘bottom’ or with a part number should face downwards.
- Positioning the Blades: Place the new blades onto the spindle, aligning the holes with the spindle shaft. Ensure they sit flush against any spacers or mounting surfaces.
- Adding Washers and Spacers: If there are washers or spacers in your mower’s blade assembly, place them in the same order as they were before removal. They are crucial for maintaining correct blade height, alignment, and reducing spindle wear.
- Securing the Blades: Hand-thread the nuts onto the spindle shafts to secure the blades, taking care to avoid cross-threading.
Tighten Securely
- Applying Correct Torque: Consult your mower’s manual for the recommended torque specification for the blade nuts. Proper torque application is vital to avoid blades detaching during operation or damaging the threads.
- Tightening Technique: Tighten the nuts evenly and gradually. If using a torque wrench, stop when you hear a click or feel the wrench ‘break’, indicating the correct torque.
- Double-Check Secureness: After tightening, perform a check by gently tugging or wiggling each blade to confirm they are securely mounted and there’s no movement.
Inspection
It’s crucial to look for bends, cracks, or excessive wear that could indicate issues with the mower itself.
Identifying these problems now can save me a lot of trouble down the line.
Check for Damage
- Inspect Removed Blades: After taking off the old blades, examine them for any signs of wear or damage. Look for bends, cracks, or excessive dullness that could affect the quality of the cut or potentially harm the mower.
- Look for Uneven Wear: Pay attention to uneven wear patterns on the blades. This could signify an issue with the level of the mower’s deck.
- Assess Blade Condition: If a blade is damaged, opt to replace it rather than just sharpening. A blade’s balance is as important as its sharpness. An unbalanced blade can lead to vibrations, which exert unnecessary stress on the mower’s engine and bearings.
- Check Spindle Housing: Examine the spindle housing for wear or damage. This component is critical for the smooth operation of the new blades.
- Ensure Optimal Operation: A comprehensive check of these components is vital to ensure that the new blades will operate efficiently, providing a clean cut and maintaining the mower’s overall health.
Which tools you Would need
- 3/8 Socket: Essential for removing the belt covers. This socket size is specifically used for the bolts on the belt covers, which need to be taken off first.
- 1/2 Socket: Used for the access panel bolt. This socket is crucial when it’s time to remove the blades from the mower.
- 15/16 Wrench: Required for loosening the nuts that hold the blades in place. It’s a key tool in the blade removal process.
- 9/16 Wrench: Useful for adjusting the belt tension. This wrench plays an important role in ensuring the mower’s belt is properly tensioned.
- Block of Wood or Blade Removal Tool: A safety tool to prevent the blade from spinning while working on it. The block of wood is wedged against the blade, immobilizing it during the removal process.
- Gloves for Safety: Protective gloves are essential to safeguard your hands from sharp edges while handling the blades and other parts of the mower.
Maintenance Tips
- Clean After Each Use: Always clean off grass clippings and debris after using the mower. This step is crucial to prevent build-up that could lead to corrosion or blockages in the discharge chute.
- Regularly Check Tire Pressure: Inspect the tire pressure regularly. Uneven tires can lead to uneven cuts on your lawn, affecting the quality of the mowing.
- Inspect Belts and Pulleys: Regularly check the mower’s belts and pulleys for signs of wear or damage. Look out for cracks or fraying and replace them immediately if found, to prevent unexpected breakdowns.
- Adhere to Oil Change Schedule: Follow the manufacturer’s recommended schedule for oil changes. Typically, this would be after the first 8-10 hours of use and then every 50 hours of operation.
- Maintain Air Filter and Spark Plug: Keep the air filter and spark plug in good condition. A clogged filter can reduce performance, and a faulty spark plug may prevent the mower from starting.
- Monitor Blade Sharpness: Regularly check the sharpness of the blades. Dull blades can tear the grass, leading to an unhealthy lawn. Sharpen the blades a few times each season, depending on how frequently you use the mower, to ensure a clean and crisp cut.
Troubleshooting Common Issues During Blade Replacement
- Rusted or Overtightened Nuts: If the nuts holding the blades are rusted or overtightened, they can be difficult to remove. Applying penetrating oil and allowing it to soak can help loosen them. For particularly stubborn nuts, using a breaker bar can provide the extra leverage needed.
- Correct Blade Alignment: Properly aligning the new blades is crucial. Ensure that the ‘bottom’ label or the part number on the blades faces the ground. Incorrect installation, such as installing them upside down, will lead to ineffective cutting and necessitate redoing the installation.
- Securing Blade Removal Tool or Block of Wood: The tool or block of wood used to prevent the blade from rotating can sometimes slip. It’s important to secure it properly to avoid potential injury or damage to the mower. Double-check to ensure it’s firmly in place before proceeding with the removal or installation process.
- Reinstalling the Deck and Routing the Belt: When reinstalling the deck, pay close attention to the routing of the belt. It should be routed according to the manufacturer’s diagram. Incorrect routing can lead to poor mower performance or even damage. Taking extra care during this step can prevent future issues.
Our Verdict
Changing the blades on my favorite zero turn mower, as I’ve walked you through, isn’t just a chore—it’s an investment in my mower’s health and my lawn’s beauty. I’ve always approached it with a methodical mindset, valuing safety and precision above all.
The transformation is palpable; a well-maintained mower with sharp blades makes lawn care not just easier, but also a joy.
Following these steps, from powering down for safety to the meticulous blade installation, has not only enhanced my mower’s performance but also extended its life. It’s rewarding to see the results—a pristine, evenly cut lawn that’s the envy of my neighborhood.
Remember, regular maintenance, especially blade changes, is key. It’s a satisfying DIY task that pays off every time I admire my lush, green lawn.
So, go ahead, give your mower the care it deserves, and enjoy that smooth, satisfying cut. Happy mowing!
Frequently Asked Questions
Can I sharpen the blades of my zero turn mower instead of replacing them, and how often should i do it?
I can sharpen my mower blades rather than replace them, aiming for at least once per mowing season or whenever they appear dull, to maintain a crisp, healthy cut on my lawn.
How do I properly dispose of my old mower blades after replacement?
I typically recycle my old mower blades at a local scrap metal facility to ensure they’re disposed of responsibly. It’s an easy and eco-friendly way to clear out the garage clutter.
What are the signs that indicate my mower blades are too worn to be sharpened and need to be replaced?
I know it’s time to replace my mower blades when they’re heavily nicked, bent, or the cutting edges can’t be sharpened without compromising the blade integrity. It ensures a healthy lawn.
Is there a specific time of year or mowing season when I should change my zero turn mower blades?
I typically change my mower blades at the start of the mowing season or after 25 hours of use to ensure a clean cut and maintain lawn health.
Can using aftermarket blades affect the performance of my zero turn mower, and if so, how?
I’ve noticed that using aftermarket blades can impact my mower’s performance. They may not cut as efficiently, and could even cause extra wear on the engine if they’re not perfectly balanced.